
Without a nation of fantastic citizens that truly believe in the Land of the Free, there isn’t a nation worth defending and this means that anyone that has served, been injured, or died in the process, truly had no value or reason to do so.
Read moreOpinion: Mission Lost

General Dwight D. Eisenhower meeting with men from Co. E, 2nd Battalion, 502nd Parachute Infantry Regiment (Strike) 101st Airborne Division, just before they load up for the drop on Normandy, June 5, 1944. The majority of the men in this photo were killed or wounded in battle a few hours later.
In talking with several veterans over the last few days, I am reminded that many of the problems that are being highlighted in society today were not as present during our time in the military. I took some time to think this through and I would like to share my thoughts with whomever would care to read.
A wide variety of people join the military. Every race, religion, gender, sexuality, economic, and education group is represented in the five branches of the US military. Every person has to start off the same way: your head is shaved (if you are a male), your face is shaved (regardless if you need it), and you are given an identical uniform. You are all told the expectations and the mission. It is the same for everyone. You are mentally and physically broken down and then built back up to function in a cohesive unit. This is just the beginning of your time in service.
As you continue on, you are rewarded with rank, responsibility, and hopefully respect. That rank and responsibility should be the only things that separate you from the person in uniform on any side of you. Sure, there will be differences in how a mission should be accomplished and yes you are still allowed to have your own individual likes and dislikes, but the mission and purpose are the same for everyone. At least they should be.
I think part of the problem today is that our society as a whole has lost its shared mission or sense of purpose. Our ancestors have fought so hard to give the next generation something better to look forward to that you no longer need the naked eye to see an issue; you now need a microscope and instead of using a scalpel to correct the issue, a sledge hammer is being selected.
In the military, success is achieved because of similarities, not differences. We have more in common with a stranger than we don't. I stared at this photo on the eve of the anniversary of D-Day for a good while just thinking of what was going through the minds of these men, about to do something that had never before been done in the history of the world. Do you think they sat there wondering if the person next to them was the same race or worshiped the same God? It is more likely that they were reflecting inward and praying that the person next to them was trained and confident in the shared mission. This mission happened to be part of the larger mission which was to stop fascism and the oppression of a group of people.
I never did anything as brave as these men and I don't think I ever will. I do, however, my best to look at the similarities I have with others rather than the differences. Anyone who has spent five minutes with me knows that I want to talk for an hour and the conversations never stay on the same topic. I have talked with random strangers about cars, religion, politics, parenting, and life, never claiming to be an expert on any of those topics. Why do I do this? I don't do this in hopes that I teach someone a lesson but in hopes that I learn something. The more I learn, the more I have in common with others.
This country wasn't founded because we knew we were the best. It was founded because we wanted the chance to become better. Always strive to be a better person that what you were yesterday.
"We the People of the United States, in Order to form a more perfect Union..."
Mk7 Golf Sportwagen / Alltrack Towing Guide
Since owning my first 2017 Alltrack, I have seen a new towing capacity or general towing post weekly, sometimes almost daily, so I decided to put everything towing related in one post to make it easier to find.
No towing at all is RECOMMENDED for any Golf Variant (Sportwagen and Alltrack) in the United States (I imagine Canada might be similar since that falls under the North American Region). That is the official stance from Volkswagen. One common rumor that gets passed around is that if you tow, you will void your warranty. Your warranty won’t be voided if you tow, however, if you tow and let’s say your clutch goes bad because you decided to tow 3 tons of bricks, then it’s likely that repair will not be covered by your warranty.
Now, we all know that the same vehicles exist in the United Kingdom and Europe and over there they are rated for towing. It is important to note that since towing is common place over there, the vehicles are able to be equipped with an OEM trailer module which allows for improved stability and cooling when towing. Also, most tow with trailer brakes. Here is a breakdown of what their ratings are:
1.8T Sportwagen: 1,500 kg / 3,307 lbs braked (750 kg / 1,653 lbs un-braked)
1.4T Sportwagen: 1,500 kg / 3,307 lbs braked (670 kg / 1,477 lbs un-braked)
2.0 TDI Sportwagen: 1,600 kg / 3,527 lbs braked (710 kg / 1,565 lbs un-braked)
1.8T Alltrack: 1,500 kg / 3,307 lbs braked (750 kg / 1,653 lbs un-braked)
2.0 TDI Alltrack: 2,000 kg / 4,409 lbs braked (750 kg / 1,653 lbs un-braked)
It is important to remember that these numbers are for braked trailers and the hitches are not 1.25” hitches. Also these numbers are the same for manual and automatic (DSG) transmissions. Since most people I know that tow with their Golf Variants don’t have trailer brakes (myself included), here is a very safe rule of thumb: regardless if you use a 2” or a 1.25” hitch, do not exceed 91 kg / 200 lbs tongue weight and do not exceed 907 kg / 2,000 lbs total weight. That is the rating of Class 1 hitches (that is what is mostly available for our cars). Let’s move on to options for hitches.
Curt: 114223 Class 1, 1.25” - this part number includes the receiver and ball mount
Curt: 11422 Class 1, 1.25” - this part number is just the receiver, no ball mount
Draw-Tite: 24949 Class 1, 1.25”
EcoHitch: XV1VWGOLF02 Class 1 Hidden, 1.25” or 2”
Westfalia: 321782, 50mm ball and rated for 80 kg / 176 lb tongue and 2,000 kg / 4,409 lb towing
As for trailer wiring, there are two manufacturers with piggy-back options that I know of, and all work specifically on the NAR (North American Region) lighting behaviors of the brake and turn signals operating at the same time.
2015-2017 with halogen tail lamps: Curt C56391
2015-2017 with halogen tail lamps: Tekonsha 118730
2018+ with LED tail lamps: Curt C59236 - doesn’t appear to have plug and play adapter
2018+ with LED tail lamps: Tekonsha 118730
If you have European tail lamps or coded your NAR tail lamps to function as European, you’ll need to splice in Curt 56496 in order to have full trailer functions.
If you are interested in retrofitting an OEM trailer module to your vehicle, there is information here: http://bit.ly/mk7trailermodulediy
I really think that covers all the important aspects of towing with a Mk7 Golf Variant. I can update this post if new information arrives. Please be safe when towing, braking early and down shifting to use engine braking, and take care of your gear. To check on what your state requires when towing, visit this site for a break down: https://trailers.com/state-laws
Mk7 Golf Sportwagen/Alltrack Towing Module (J345) Retrofit
There are a lot of Mk7 Golf Variant owners that own a trailer of some sort and tow it frequently. I am one of these owners, having a fishing boat and a utility trailer, and like many, I had ordered a piggy back style harness to provide power to the trailer lights. Many people run harnesses like this on a plethora of vehicles but is it the best way to tow?
When I learned that Volkswagen offers a trailer module for almost every model in the European market, I wanted to learn more. What really sparked my interest was finding out that there is a retro fit kit available from US dealerships for the MQB Tiguan. I knew that many MQB chassis vehicles share a lot of components, to include electronics. I spent a lot of time cross referencing OEM wiring diagrams, part numbers, and cataloging the parts needed to make this happen and have successfully done this to my 2018 Alltrack S. First, let’s talk about why this is a better way to connect your tailer to your vehicle.
Lights (S, SE, SEL)
The most obvious part to this module is that it provides power to the trailer lights. There are three benefits to this module though: no piggy back harness, bulb status, and coding.
No piggy back harness means that the tail lamps stay plugged in directly to the body harness.
Bulb status is a neat feature that we may all be aware of with the vehicle as it is from the factory. If a bulb stops working on your vehicle, a warning is displayed on your information screen to tell you which one is out. Well this feature is now extended to your trailer. If your passenger turn signal on your tailer is not working, your vehicle’s information screen will tell you that it is out.
Coding is something that will effect anyone that has coded their tail lamps to operate as the European tail lamps do (brake and turn signal are independent from each other). When using the piggy back harness and this coding is performed, you need to run another wire and a converter to make the trailer work correctly. With the OEM module, any lighting coding done to the vehicle is carried over to the trailer without extra wiring.
ABS (S, SE, SEL)
This is the area that I cared most about. As soon as the trailer harness is plugged into the vehicle, the car recognizes that a trailer is now connected and that the vehicle should respond differently than if no trailer was present. The firmness of the brake pedal and the stability control are changed to reflect the trailer. If you have to make an emergency maneuver with the trailer on, the ABS (which controls many things on the vehicle) will make corrections for the fact that a trailer is attached. With the piggy back harness, the car just thinks that there is a lot of cargo in the car, which anyone that has had to make an emergency maneuver with a trailer knows that it is so much different than with no trailer. This is a pretty big safety feature.
Park Sensors (SE, SEL)
If your vehicle has the Driver Assistance Package and have park sensors on your bumpers, this feature will make you happy. Those sensors will sound off when you are approaching an object and obviously, the trailer stays close all the time. When plugged in, the module disables the rear sensors. You also get some extra features on the infotainment screen specific to the trailer that those without the package do not get.
Alarm (S, SE, SEL)
This is only available for vehicles with the advanced alarm installed and enabled. Most do not have this but if you do or choose to retro fit it, this will allow the vehicle alarm to sound if the trailer is disconnected and the car is locked. Great feature to scare away those trailer thieves.
Cooling (S, SE, SEL)
Another important feature is engine and transmission cooling. When towing, higher stress is placed on the powertrain and when the trailer is plugged in, the module tells the cooling system to run longer to prevent overheating. This applies to the engine fans, thermostat, and transmission.
There may be more features but these are the core ones that are the most important. I was originally going to make this a kit that I assembled but as you will see, it isn’t entirely plug and play and I decided to just make is a DIY instead.
Parts Needed
4F0-937-731 (Male connector for T6bc, B), $6.20 - 1 needed
A-018-545-47-26 [T6bc pin (large)], $2.64 - 2 needed
A-013-545-78-26 [T6bc pin (small)], $11.85 - 1 needed
6R0-972-930 (Male connector for T10p, C), $20.67 - 1 needed
N-907-647-01 (T10p pin), $1.04 - 3 needed
5NN-055-203 (Trailer hitch electrical kit), $230.39 - 1 needed
5G9-971-502-A (Retainer for module), $2.41 - 1 needed
1C0-973-119-B (Male connector for CAN), $7.08 - 1 needed
N-907-647-01 (Female pin for CAN), $1.04 - 3 needed
3D0-973-332 (Female connector for CAN), $17.17 - 1 needed
61-13-1-383-672 (Male pin for CAN), $1.65 - 3 needed
N-907-327-03 (Large pin for fuse panel), $1.34 - 2 needed
When dealing with wires, I tend to purchase the terminal pins and then crimp them onto the lengths of wires as needed. I do this because the finished product ends up looking much nicer and it is much cheaper to do. However, I recognize that not everyone has the tools that I do so I will give you an alternative to crimping terminal pins:
A-018-545-47-26 [T6bc pin (large)] is the pin that is on VW repair wire 000-979-152-E ($26.60). Since you need two pins, just order one wire and cut it in half.
A-013-545-78-26 [T6bc pin (small)] is the pin that is on VW repair wire 000-979-151-E ($25.20).
N-907-647-01 (T10p pin) is the pin that is on VW repair wire 000-979-009-E ($13.14).
N-907-647-01 (Female pin for CAN) is also the pin that is on VW repair wire 000-979-009-E ($13.14).
61-13-1-383-672 (Male pin for CAN) is the pin that is on VW repair wire 000-979-012-E ($18.02).
N-907-327-03 (Large pin for fuse panel) is the pin that is on VW repair wire 000-979-227-E ($25.20).
In addition to all of this, you will need spools of wire. You can use all one color or multi colored, which I use and recommend this: https://amzn.to/2LhqlYO

Looking at the schematic is important to understanding what is going on with the wiring. Since I do not have step by step photos of the process, this explanation will be the best way to understand what needs to be done. The trailer module has four connector banks, A, B, C, and D.
Bank A is a 24 pin connector that goes out to the trailer. Five of these pins are used for a traditional 4 pin trailer connector: pins 7 and 10 and jumped together, 15 is parking and brake, 18 is passenger turn signal, and 24 is driver turn signal.
Bank B is a 6 pin connector that is the main power connector for the module. Only three pins are used: pin 2 goes to ground, 3 goes to fuse panel location 38, and 4 goes to fuse panel location 28. Both are 15 amp fuses.
Bank C is a 10 pin connector that connects the module to the vehicle’s CAN gateway, or vehicle network. Only three pins are used and all three go to the BCM behind the driver side of the dash. The BCM has two large connectors that are needed for this, the one labeled A and the other is C. Pin 2 is the only one that goes to the C connector and that is for the brake switch signal. Pin 3 goes to location 16 of the A connector and 4 goes to location 17 of the A connector. Now what took me a little figure out is you have two options here. One is to just splice the new wire into the factory wires that go into those positions. I don’t like messing with factory wires so I went with the way that is shown. The three brand new wires that you are running from the hatch (where the module is located) will have two ends. Three of these end will have a male pin and three will have a female pin. The three male ends will go into the small 3 pin female connector that you purchase (3D0-973-332). The three female ends replace the factory wires in the BCM connectors. The three female factory wires then are plugged into the small 3 pin male connector that you purchase (1C0-973-119-B). All of this allows for one nice CAN Gateway loop without cutting or splicing the factory wires once the two small 3 pin connectors are plugged into each other.
Bank D is left empty at this time. This is used specifically for the OEM European swiveling hitch and the switch that goes with it. I have these pins written out but if you are looking to wire this up specifically, not only can I order you those parts, just contact me and I can provide you the wiring as well.


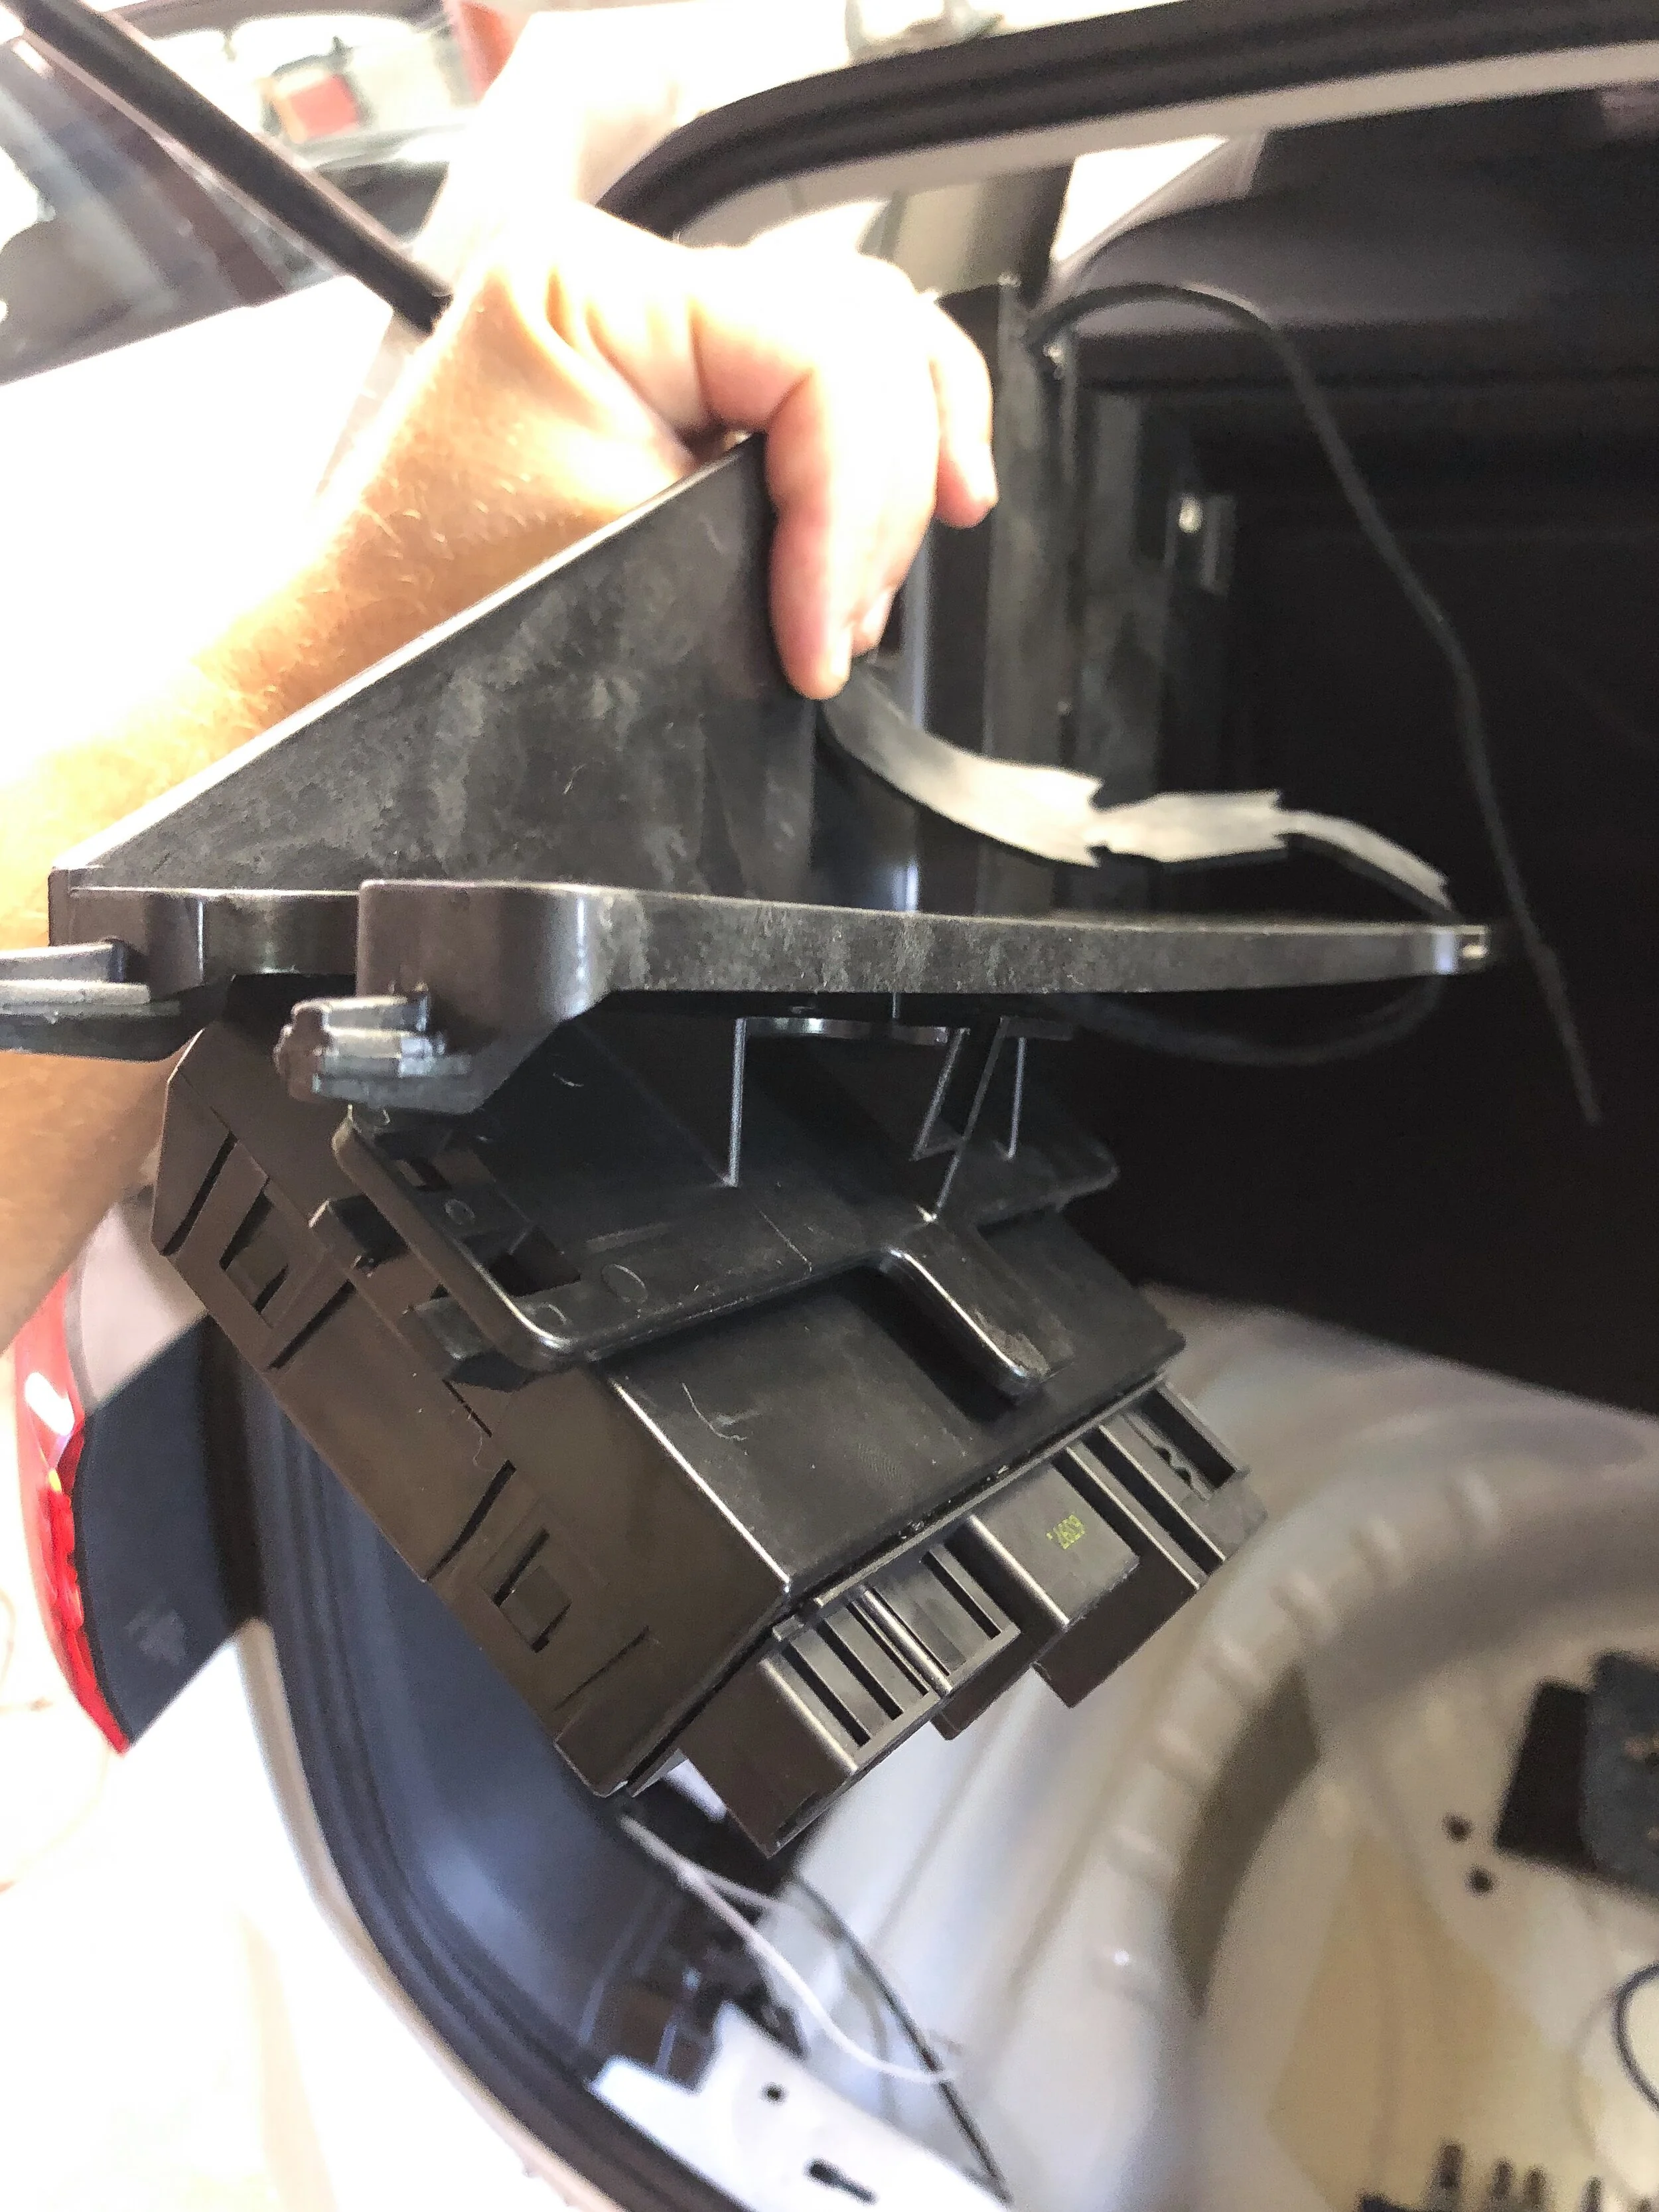

Personally I feel that everything else is pretty easy to figure out. The module and its retainer bracket is connected under the tray where the OEM tool kit is located on the driver side of the hatch. I believe it is one bolt that holds that tray in place and then the retainer is snapped into that tray and the module snaps into the retainer. You will need to lift the hatch carpet in order to route the trailer wires. You remove one of the round rubber grommets and the nice part is the OEM module kit wiring has a grommet built in to replace the blank one. Now, you will need to loosen up the tape on the built in grommet to be able to shift the position. The kit is designed for a Tiguan and it is close, but not close enough.
The wires that go to the front of the vehicle get snaked up through the driver side channel with the rest of the wiring. If you don’t have a nice snake tool to run the wires, you can grab THIS ONE from Amazon. You will need to take out the dash cubby and the trim pieces around the hood latch lever in order to get to the BCM. The BCM plugs are probably the hardest part of the job, next to plugging the fuse panel wires into the back of the fuse panel. I really don’t have many suggestions to making it easier but take your time. The fuse panel wires do just push into the back of the panel so make sure they are going into the correct positions. Another way you could add the fuses to the panel can be found in “A way to add fused circuits to your fuse panel” on VWVortex.
You will have to figure out your own method for mounting the trailer wiring. I had some flat aluminum and threaded rivets that I fabricated onto the bumper.


Coding
For this, I used VCDS to do my coding but I am sure you can use any other program to do this. Also, I only have coding for my vehicle, which is an S model with no packages. There may be additional coding for the park sensors.
Select: 19 - CAN Gateway
Select: Installation List
Scroll and check the box for: 69 - Trailer
Select: Save coding
Close Controller, Go Back - 06
Select: 03 - ABS Brakes
Select: Adaptation - 10
In the first drop down menu, select: Vehicle and trailer stabilization
Change the value to Activated and select Do It!
Select: Go Back
Close Controller, Go Back - 06
Select: 01 - Engine
Select: Coding - 07
Toggle to Byte 5 and make sure Bit 4 is checked
Do It!
Close Controller, Go Back - 06
Now, I will share with you all of the coding Bytes/Bits I have on my module:
Select: 69 - Trailer
Select: Coding - 07
Byte 0, Bit 0-7: 02 Market/Country: North American Region (NAR)
Byte 1, Bit 4-7: 10 Partial Network Operation active
Byte 3, Bit 0-7: 00 Terminal 30 Output (Pin 9) NOT active)
Byte 4, Bit 0-7: 02 Terminal 30 Output switched (Pin 10) active while Trailer connected
Select: 09 - Cent. Elect.
Select: Security Access - 16
Enter: 31347
Select: Adaptation - 10
Search for Networking-Anhaengeranschlussgeraet
Change the value to Installed
Do It!
And that is it! I think. I know it isn’t an absolute complete guide to the job but it isn’t a job for the faint at heart either with or without guidance. Feel free to comment on here or email me about this if you have any other comments or questions about this.
September 11, 2019
The 9/11 memorial is just that: a constant reminder of those that we don’t want to be gone. I hope it’s also a reminder of what happened that day so that the embers of that fire that was within all of us may never, ever, be extinguished.
Read more